Posts

The pair of pants saved

Image
As mentioned in the post about the horrible mistake of sewing the pockets in the back of a pair of pants I did want to finish them after all, because of the promise I made my daughter. She needs a couple of new pants and this was the first pair, more or less a trial version. I have no photos of her wearing them, she took them home with her and I will hear from her whether they are comfortable in wearing so that I can make more. This is how the back bacame. The pattern has no seams, I made a more sporty version of it, correcting the mistake. I had no fabric left to cut new back parts. The front is as basic is the front of trousers can be. Here I changed the difficult pocket flaps to regular inseam pockets. I had no interest any more to do the pockets as in the pattern and if there’s a next version it will probably be inseam pockets again. The pockets are the most difficult part of this pattern. Apart from my own mistake in sewing them in the wrong pattern piece I think a “normal” single...
This was an easy sew

Image
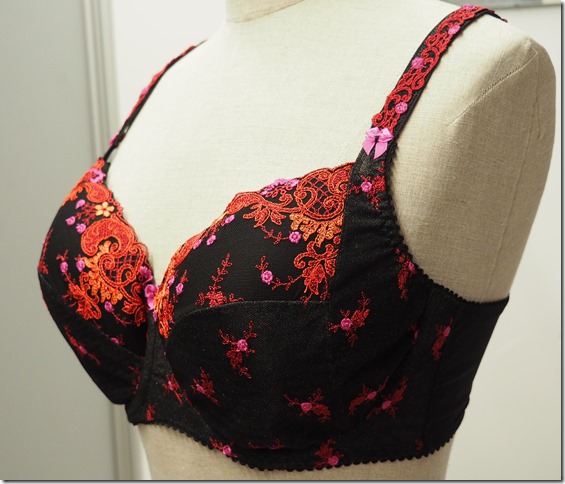
Reading the comments to my previous post was making me feel better: I’m not the only one making such a mistake. Thank you for taking the time to tell your mistake. Some of you said that reading my post made them feel better too and I can fully understand. In the online world we usually tend to show the successes and less the failures that are an inevitable part of sewing too. It’s something I do as well and I was in doubt about posting about the mistake and glad I did in the end. I was able to save the pants and will finish them this weekend, when my daughter is home again she can try it on to determine the length of elastic in the waist. In the meantime I needed something to cleanse the palate, so I made a bra from one of the sets of material I bought when I met up with Jane . I’ve used this lace before (in 2013, can’t believe it’s that long ago), but with black lycra. Now a full embroidered lace was available too and lace trim for the shoulderstraps. Makes it quite different. It’s a...

The biggest mistake ever

Image
This doesn’t look too bad. It’s my take on the pocket of the StyleArc Talia pants. The instructions are minimal, there are instructions on their website but I was not sure it would look good. So I decided to make a “window pane” construction. After I had done all the work I was wondering why the pocket bags didn’t meet the center front, they did in the paper pattern….. Turned out I’ve sewn the pocket in the back pattern pieces. The BACK!! In the many years that I sew I’ve made every mistake you can think of. But this one made me think I’ve gone mad. Bet you never did this! How did this happen? A week ago I cut this pair of pants to quickly sew it up without the pocket to have my daughter try it on. So I did not cut the front with the ‘indent’ for the pocket but just cut a straight line. Both for ease of sewing and for the fact that I was not sure about the construction in the instructions. After my daughter had tried it on and I marked the few adjustment necessary,  I just opened p...

Burda dress 119, changes to pattern and construction

Image
There were a few changes I made to the pattern prior to and during construction. For those of you interested in the details, this is what I did. As indicated in the first post on this dress last week, I lengthened the upper body by 1.5 inch. This isn’t hard to do: fold the pleat on the right pattern piece, match it with the placement line on the left pattern piece and you have a full front in which it’s easy to draw a line to lengthen (or shorten) it. I did this just below the armhole. After that the seamlines, diagonal fold and placement lineslines are trued again. Of course this change of length is to be done on the back pattern piece too. This is not an error in the pattern piece. I know my upper body is longer than average and it’s a change I always do in Burda patterns. The other change was cutting off the extra triangle pieces that are on the right side pattern pieces for the top, skirt and waist part. Initially I cut them and understood what the intention was, an extra pleat abo...

It’s not August yet…

Image
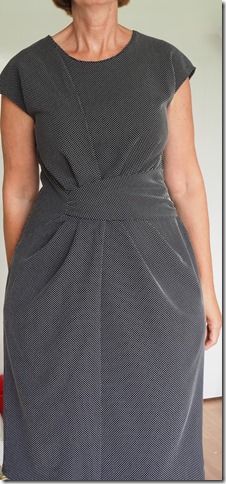
and I finished my first dress from the August issue of Burda. I’m quite happy with how this dress fits and how it looks on me. The most visible change to the pattern is the neckline. The original neckline was very high and it felt like it was choking me. I didn’t want to disturb the pleat and widened it just a bit but went 4-5 cm down in center front. I did a few pattern and construction alterations and will write a separate post on that later this week.

Starting to sew from August Burda

Image
I didn’t keep to my pledge of sewing something from a (new) Burda magazine each month. There were two skirts I forgot to blog about, but even if I count these, there are no 6 or 7 garments from Burda magazines sewn by me this year . The August issue could change the numbers. It’s a great issue with quite a few patterns I’d like to make. After seeing previews and especially after seeing some pictures shared by a friend with a subscription, I stalked the newsagent for this issue. It started with a little disappointment that the jacket I like so much is in the petite size range. Perhaps I will draft the details in my jacket pattern at some point, but not now. I have a nice event to go to next week and thought it might be nice to sew a new dress for the occasion. This is the pattern I’m using, number 119: Not a very straightforward dress to sew. After tracing the pattern pieces the first thing I did was trying to “assemble” the paper pieces, based on the instructions and common sewing sens...

StyleArc Evie top

Image
At StyleArc’s site this is simply described as Knit tank top with a shaped hemline. I would add that is has some flare. I made my second version this week. I added a little bit to the flare. This is the first one I made, shown as work in progress a few weeks ago. It’s still the only picture I have of it, but it’s been worn and washed several times already (it is hemmed and topstitched after this photo was taken). Being such an easy to wear style on warmer summer days I made another one, in a fabric with a print this time. In the past I’ve had some problems getting at ease with my coverstitch machine, but we’re working well together now. I’m very happy with the finishing details. Inside of the neckline. There was a tan coloured thread on my serger, the black is from the coverstitch. The hem, done as I described in this post . Basting it first makes it take 10 minutes extra, but so worth it. The cutting line is enclosed by the stitches.