Posts

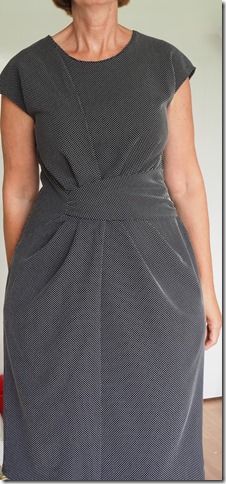
Burda dress 119, changes to pattern and construction

Image
There were a few changes I made to the pattern prior to and during construction. For those of you interested in the details, this is what I did. As indicated in the first post on this dress last week, I lengthened the upper body by 1.5 inch. This isn’t hard to do: fold the pleat on the right pattern piece, match it with the placement line on the left pattern piece and you have a full front in which it’s easy to draw a line to lengthen (or shorten) it. I did this just below the armhole. After that the seamlines, diagonal fold and placement lineslines are trued again. Of course this change of length is to be done on the back pattern piece too. This is not an error in the pattern piece. I know my upper body is longer than average and it’s a change I always do in Burda patterns. The other change was cutting off the extra triangle pieces that are on the right side pattern pieces for the top, skirt and waist part. Initially I cut them and understood what the intention was, an extra pleat abo...
It’s not August yet…

Image
and I finished my first dress from the August issue of Burda. I’m quite happy with how this dress fits and how it looks on me. The most visible change to the pattern is the neckline. The original neckline was very high and it felt like it was choking me. I didn’t want to disturb the pleat and widened it just a bit but went 4-5 cm down in center front. I did a few pattern and construction alterations and will write a separate post on that later this week.

Starting to sew from August Burda

Image
I didn’t keep to my pledge of sewing something from a (new) Burda magazine each month. There were two skirts I forgot to blog about, but even if I count these, there are no 6 or 7 garments from Burda magazines sewn by me this year . The August issue could change the numbers. It’s a great issue with quite a few patterns I’d like to make. After seeing previews and especially after seeing some pictures shared by a friend with a subscription, I stalked the newsagent for this issue. It started with a little disappointment that the jacket I like so much is in the petite size range. Perhaps I will draft the details in my jacket pattern at some point, but not now. I have a nice event to go to next week and thought it might be nice to sew a new dress for the occasion. This is the pattern I’m using, number 119: Not a very straightforward dress to sew. After tracing the pattern pieces the first thing I did was trying to “assemble” the paper pieces, based on the instructions and common sewing sens...

StyleArc Evie top

Image
At StyleArc’s site this is simply described as Knit tank top with a shaped hemline. I would add that is has some flare. I made my second version this week. I added a little bit to the flare. This is the first one I made, shown as work in progress a few weeks ago. It’s still the only picture I have of it, but it’s been worn and washed several times already (it is hemmed and topstitched after this photo was taken). Being such an easy to wear style on warmer summer days I made another one, in a fabric with a print this time. In the past I’ve had some problems getting at ease with my coverstitch machine, but we’re working well together now. I’m very happy with the finishing details. Inside of the neckline. There was a tan coloured thread on my serger, the black is from the coverstitch. The hem, done as I described in this post . Basting it first makes it take 10 minutes extra, but so worth it. The cutting line is enclosed by the stitches.

Linen dress

Image
If you’ve seen this post before without text: I clicked the wrong button and uploaded the post accidentally that only contained pictures. This fabric spoke to me (loudly!) when I was at a fabric market this spring. I passed the stall once, but when I passed it a second time I could  not resist and bought it. It’s a 100% linen fabric, which I love to wear in summer. I lined it with a viscose (rayon) good quality lining and it’s ever so comfortable. The pattern is self drafted based on the sloper from the Suzy Furrer class and boat neck instructions from her class as well. As instructed I used the lower point for rotating the darts (for those interested/having experience with her method). Next time I would reposition the bust dart again and have it at the higher point. In this rather busy print it’s not that obvious, but I think it’s a bit low. This photo reminds me of the fact that I still have to sew the lining to the slit in the back (and no, I’m not that addicted to my phone , it...

Marking seam allowances

Image
Though I admit that default seam allowances to pattern pieces can be very useful when the seams are long and more or less straight, most of the time I prefer to mark the exact seam lines on my fabric. Especially when the seams have short curves, like a neckline, armhole or princess seam. The same is true for darts: I like to know exactly where the lines on the pattern were (or where I drafted them) and don’t want to rely on pins or tacks with basting thread. My preferred way of marking is with carbon paper. I know I’ve written about it before but it’s a long time ago. Apart from the carbon paper, which is also called wax paper, you need a tracing wheel and a table or flat surface you can put the paper on. I use a cutting mat for it. The way it’s done is marking the pieces first while the pattern is still attached to the fabric, then you take the paper off, flip the fabric over to the other side and retrace again over the lines you made. I use this for almost all patterns that don’t inc...

Meeting Jane

Image
Last Saturday I had the pleasure of meeting Jane from the blog Lucky Sew and Sew . I’ve been following her blog for years and when I learned she was coming to Amsterdam I couldn’t pass on the opportunity and asked whether it was possible to meet. Lucky me, she liked the idea to meet too and her husband didn’t mind to be on his own for a couple of hours (lovely man) so the arrangement was easily made. Jane was curious to see the famous Kantje Boord lingerie fabric shop so that’s where we met. Needless to say we spent quite a bit of time there and of course fabrics and notions came home with us too. Jane was wearing one of her lovely tops that she showed in her last post before her trip, looking great and ever so comfortable for travelling. Thank you Jane for taking the time to meet, I enjoyed every minute of it. My haul did include these beautiful combinations. I hadn’t been to the shop for quite a while and it was inspiring to go there again. These fabrics are shouting at me to be made...