Posts

Comparing sloper and pattern

Image
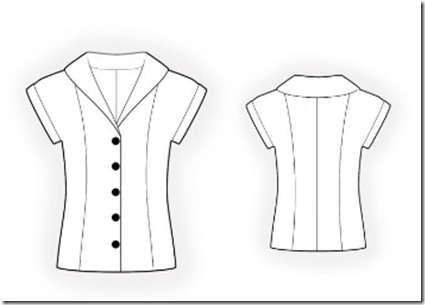
In a post some time ago I mentioned using my sloper as a tool to analyse the fit of a pattern. Today I did that again and took some pictures of the process. To understand what I’m comparing it’s important to know what my sloper stands for. I made my sloper in Suzy Furrer’s Craftsy class The bodice sloper . You start with a moulage which is tightly fitted to your body. From this moulage you make the sloper which has the (minimum) amount of ease needed for a fitted blouse/dress/skirt etc. This sloper is the base for the pattern drafting you do. The pattern I traced is a top from Knip mode, issue April 2017 that was in the shops this week. Some nice patterns in it! I like the neckline of this top for summer, not too sure about the dropped shoulder. On the other hand: sometimes you have to try something different. This is the line drawing and a picture form the Knip mode shop on their website , which has more pictures (front and back!) than you see in the magazine.    My first che...

A Lekala blouse

Image
As some of you already thought, sewing is a bit low on the priority list at the moment. Which is bad, as I absolutely need new clothes. Yes, I know, there should be enough but I’m missing a few things to get good combinations. A nice, easy to make pattern is helpful when time is an issue. I didn’t take the time to draft myself but bought a Lekala blouse pattern that I liked. Their prices are low and for me their way of making a pattern seems to work. The winter coat was good (worn it very often) and this blouse is a good basic. Shoulder princess seams, shawl collar, clean lines. I made it from fabric that was gifted to me by a sewing friend during our annual sewing retreat in Canterbury. She thought it was a “Sigrid” fabric and she was right. Said something along the same lines being “me fabric” in my previous post, think I’m quite predictable in what I like and what I don’t like. Good thing probably, though I’m looking for a bit more colour in my spring clothes. This fabric has a...

Top finished

Image
The top I drafted is made up in fashion fabric. A remnant piece that I found at the fabric market last year. Did not know the contents but as it was a “Sigrid” fabric (as one of my friends immediately said when I showed the picture in our Whatsapp group) I had to buy it. It was not complicated to draft and an easy make too. Only the point of the v-neckline requires some thought and I might do it a little different next time. There certainly will be a next time as I like the neckline a lot. The pleat is not something I will repeat too often, but it’s a nice detail. This was the original inspiration garment. PS: thanks to those who commented on keeping a diary of my allotment plans a few posts ago. I’m experimenting with OneNote and an (old-fashioned?) paper notebook. It crossed my mind to start a blog about it too, but I’m such a beginner. Plus the time it takes. Might change my mind. Perhaps I’ll do a closing picture occassionally like this, my tomato seedlings and part of the p...

Drafting (again)

Image
When a pattern you draft does not give the result you want, you may get discouraged and think “why draft, I’ll use and change commercial patterns”. That’s what happens to me, until I realize that I have lots of fitting problems then too or when a garment comes along that I want to copy urgently. That’s what happened when I saw this thread on PatternReview discussing this top (which costs $ 400! I’ll never spend that much on a top): Quite simple looking, yet elegant. Very much a summer top, but also wearable under a jacket. Couldn’t help myself and tried to draft it. This is my muslin, based on my sloper drafted in Suzy Furrer’s Craftsy class. In her class on neckline variations Suzy Furrer shows how to draft a funnel neckline and an opera neckline but both in variations that stand away from the neck. I could use the information to draft this neckline hugging version. My observations: funnel neckline close to the neck curved v-neck 1 to 2 inched seam below lowest point of v...

Sewing update

Image
I’ve been busy with a lot of things, sewing was a bit on the background in the past two weeks. There’s a large painting project in my house that I started that takes quite a bit of time (2 staircases and 11 doors, discovered the white really needs two coatings to be solid, even though the original colour was just a pink white). More fun, but also time consuming in the next few months, we’ve started an allotment garden. The plot is not very far from our house, only a few minutes by bicycle, which is nice. I won’t write much about it here, but am thinking about how to record our experience with growing vegetables and fruit. If you’ve any suggestions on that, let me know. The dress is in hibernation mode and might remain there for a while. It’s been a lovely excercise in pattern drafting, unfortunately not giving the result I wanted. It’s a real winter dress though (at least the fabric is) and though there’s still some snow left from this weekend, the sun that is now shining in my room i...

Drafting a dress–5, sleeve comparison

Image
As mentioned in my post of yesterday I’m doing a separate post on the sleeve draft. It’s a bit of a nerdy post probably. I write it for those of you who are interested in pattern drafting but also for myself, to remind myself of the differences now I’ve taken the time to do three drafts based on different systems for the same garment. The result of the different drafts (focus on the sleevecap). First the Suzy Furrer draft. Ease is added before drafting giving as guideline 1/2 inch for dresses and blouses, 1 1/4 inch for jackets and coats. The total circumference of the armhole on the front and back + ease is a measurement on which the “square size” is based. The measurements for the square size are given in the book (or in the course materials from the Craftsy course). It’s the dotted line in the drawing. Based on this square the rest of the sleeve is drafted. Second the Helen Joseph-Armstrong draft. The guideline for ease is different and given as 1 1/2 inch for sizes 10 and above,...

Drafting a dress - 4

Image
I’ve been working on the sleeves for the dress. The original has short sleeves and I intended from the start to make 3/4 length sleeves. Whicht meant of course drafting those too. I am rather intrigued by the various ways you can draft sleeves. Because of that I took my time and drafted several versions of the sleeve, using 3 different drafting systems: the book Building Patterns   by Suzy Furrer (same as in her classes on Craftsy), Patternmaking for fashion design by  Helen Joseph-Armstrong and the one-piece sleeve from the Dutch Danckaerts system from the book dresses. It’s fascinating to see the different approaches and still coming to a more or less similar sleeve draft. That certainly is true for the methods used by Suzy Furrer and Helen Joseph-Armstrong. The cap of the sleeve drafted by those methods was very similar, the way to get there very different. The Danckaerts system gives a different shape for the back of the sleeve, which I know not to be good on me but I wa...