Posts

Top finished

Image
The top I drafted is made up in fashion fabric. A remnant piece that I found at the fabric market last year. Did not know the contents but as it was a “Sigrid” fabric (as one of my friends immediately said when I showed the picture in our Whatsapp group) I had to buy it. It was not complicated to draft and an easy make too. Only the point of the v-neckline requires some thought and I might do it a little different next time. There certainly will be a next time as I like the neckline a lot. The pleat is not something I will repeat too often, but it’s a nice detail. This was the original inspiration garment. PS: thanks to those who commented on keeping a diary of my allotment plans a few posts ago. I’m experimenting with OneNote and an (old-fashioned?) paper notebook. It crossed my mind to start a blog about it too, but I’m such a beginner. Plus the time it takes. Might change my mind. Perhaps I’ll do a closing picture occassionally like this, my tomato seedlings and part of the p...

Drafting (again)

Image
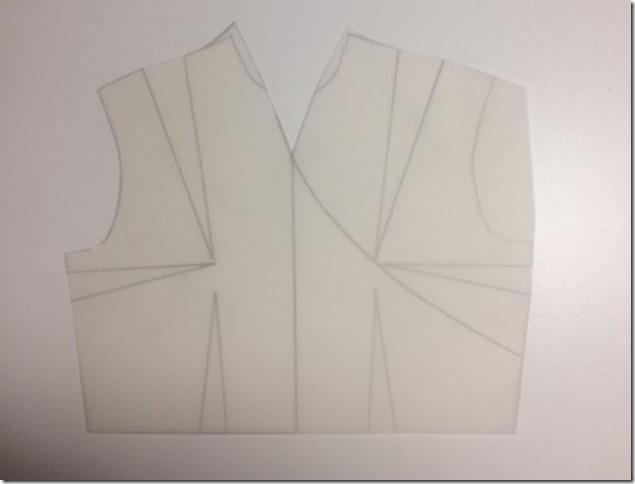
When a pattern you draft does not give the result you want, you may get discouraged and think “why draft, I’ll use and change commercial patterns”. That’s what happens to me, until I realize that I have lots of fitting problems then too or when a garment comes along that I want to copy urgently. That’s what happened when I saw this thread on PatternReview discussing this top (which costs $ 400! I’ll never spend that much on a top): Quite simple looking, yet elegant. Very much a summer top, but also wearable under a jacket. Couldn’t help myself and tried to draft it. This is my muslin, based on my sloper drafted in Suzy Furrer’s Craftsy class. In her class on neckline variations Suzy Furrer shows how to draft a funnel neckline and an opera neckline but both in variations that stand away from the neck. I could use the information to draft this neckline hugging version. My observations: funnel neckline close to the neck curved v-neck 1 to 2 inched seam below lowest point of v...

Sewing update

Image
I’ve been busy with a lot of things, sewing was a bit on the background in the past two weeks. There’s a large painting project in my house that I started that takes quite a bit of time (2 staircases and 11 doors, discovered the white really needs two coatings to be solid, even though the original colour was just a pink white). More fun, but also time consuming in the next few months, we’ve started an allotment garden. The plot is not very far from our house, only a few minutes by bicycle, which is nice. I won’t write much about it here, but am thinking about how to record our experience with growing vegetables and fruit. If you’ve any suggestions on that, let me know. The dress is in hibernation mode and might remain there for a while. It’s been a lovely excercise in pattern drafting, unfortunately not giving the result I wanted. It’s a real winter dress though (at least the fabric is) and though there’s still some snow left from this weekend, the sun that is now shining in my room i...

Drafting a dress–5, sleeve comparison

Image
As mentioned in my post of yesterday I’m doing a separate post on the sleeve draft. It’s a bit of a nerdy post probably. I write it for those of you who are interested in pattern drafting but also for myself, to remind myself of the differences now I’ve taken the time to do three drafts based on different systems for the same garment. The result of the different drafts (focus on the sleevecap). First the Suzy Furrer draft. Ease is added before drafting giving as guideline 1/2 inch for dresses and blouses, 1 1/4 inch for jackets and coats. The total circumference of the armhole on the front and back + ease is a measurement on which the “square size” is based. The measurements for the square size are given in the book (or in the course materials from the Craftsy course). It’s the dotted line in the drawing. Based on this square the rest of the sleeve is drafted. Second the Helen Joseph-Armstrong draft. The guideline for ease is different and given as 1 1/2 inch for sizes 10 and above,...

Drafting a dress - 4

Image
I’ve been working on the sleeves for the dress. The original has short sleeves and I intended from the start to make 3/4 length sleeves. Whicht meant of course drafting those too. I am rather intrigued by the various ways you can draft sleeves. Because of that I took my time and drafted several versions of the sleeve, using 3 different drafting systems: the book Building Patterns   by Suzy Furrer (same as in her classes on Craftsy), Patternmaking for fashion design by  Helen Joseph-Armstrong and the one-piece sleeve from the Dutch Danckaerts system from the book dresses. It’s fascinating to see the different approaches and still coming to a more or less similar sleeve draft. That certainly is true for the methods used by Suzy Furrer and Helen Joseph-Armstrong. The cap of the sleeve drafted by those methods was very similar, the way to get there very different. The Danckaerts system gives a different shape for the back of the sleeve, which I know not to be good on me but I wa...

Drafting a dress - 3

Image
What lovely comments on my posts on drafting. Based on your comments I will try to give more details on drafting the funnel neckline in another post (if I can do that without infringing copyright) and will show you how I use my sloper to check a pattern. There were other questions and I'll answer these in another post. Never feel that you might not have enough experience to comment or apologise for being late with a comment. No need!! I love to read them all.  Today two pictures of my progress. The front now stays in place, so the change worked.  Aweful selfie photos in a mirror, you'll get the idea. The pleats are only provisionally pinned and I will change them a bit before closing the seam. Just wanted to know if I was on the right track.  On the inside I used silk organza on the bias cut triangle at the waist to stabilize and used a little bit at the right front to eliminate bulk for the zipper in the side seam.

Drafting a dress - 2

Image
First I’d like to thank those of you who commented on my recent posts. I have a few very regular commenters (extra thanks!) and recently I’ve seen quite a few new names too. Welcome to my blog and please share your thoughts. In a time that blogging is regarded obsolete by some it’s nice to know this is still a lively community. Back to the story of the dress. I’ve cut and basted the dress and there was a moment of disappointment. The pleats did not form a nice fold, there is too much fabric. Worse even, the neckline was gaping a lot. So much that I don’t want to share a photo. I think the pleats are just too long. As I said, I’ve drafted this dress two years ago and I’m not sure now whether I took out the space of the darts. Well, better too long than too short. I hope that these will be fine with some manipulation. Part of the gaping is probably caused by my figure. If I would have an A or B cup it wouldn’t be so bad, but there is a bit more to cover. It would be fine if I could pu...